Search This Blog

Monday, 21 December 2015

YSL Couture Palette - Metal Clash


I purchased this pretty fall palette as a birthday treat for myself as I loved the look of the colours included and I normally purchase larger palettes from Urban Decay for example however I have found myself away from home a lot in the past year and thought it would be nice to have something more compact when I'm travelling.

(I usually end up being lazy and just taking a cream shadow with me - boy do I love cream shadows...) 


  The palette itself feels sturdy and I find the design fun and a bit edgy and futuristic. It comes with two mini sponge applicators which - let's face it, I'm never going to use.


  The shadows themselves are lovely. They are quite sheer so if you are after something heavily pigmented then these might not be for you. Personally I mostly buy shadows with loads of pigment and so these make a nice, subtle change which I feel makes them more flattering. The highlights for me are that icy, shimmery pink which is gorgeous and the gold, which is very heavy on the glitter and great for the party season and they blend BEAUTIFULLY. That's the key thing that I love about this palette is that the shades blend effortlessly from one colour in to the next, however you apply them.

It's pretty pricey at £42.50 and I don't feel like you get a whole of product for your money. It's definitely a luxury product and I think it feels that way when you use it. If you're tempted, maybe try and catch it at a bargain in the January sales.

Sunday, 6 December 2015

Venus II Palette Review


Today I am giving you my first impressions of the brand new Venus II Palette from Lime Crime.


(Now I know there have been some controversies surrounding this brand so I will say this up front: I personally chose to purchase this palette as well as some other Lime Crime products which I will review here very soon, because I loved my Venus palette and there were some great bargains in the Black Friday sale which for me were too good to pass up. I am not vegan myself and so whether the products are truly vegan or not is something that doesn't really affect me so long as I am only using these products on myself. I'm not going to comment on every issue individually. Whether you yourself want to purchase from this brand is up totally to you.)


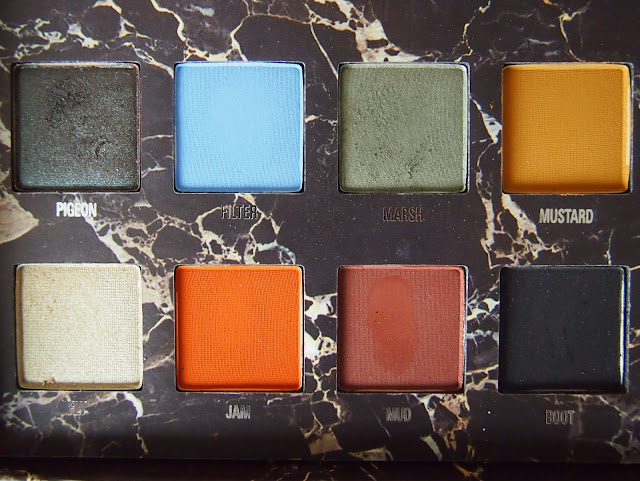
Shades from left, top row: Pigeon, Filter, Marsh, Mustard. Bottom row: Fly, Jam, Mud, Boot.


The main reason I decided to purchase this palette was because I felt it featured all those odd colours that I see people wearing from MAC that I don't own and REALLY wish I did. In particular those bold yellow and bold orange shades. In addition to that, I thought pigeon and fly were to die for, with those gorgeous iridescent shimmers.

These shadows all live up my expectations. They are pretty pigmented although perhaps they could be a little more so. I feel they are less pigmented than those in the original Venus palette but they still have enough colour for me.

Pigeon is a stunning murky burgundy/green iridescent shimmer and possibly my favourite shade in the whole thing. I found the burgundy shows up as the primary shade and it is dark, so be prepared for grungy eyes with this.

Filter is nicely pigmented, but this is the one shade in the palette I don't really see myself wearing. If matte baby blue is your thing though then this is exactly that.

Marsh I would say is a slightly shimmery army green. I like it as I like to wear green shadows now and then as I have green eyes and it compliments pigeon very well.


Mustard is... well... a mustard matte yellow.

Fly surprised me as I thought it would be more similar to Aura from Venus I, however it has a divine subtle green shimmer to it which I love and really compliments the other green shades in the palette. It's quite vibrant too.

Jam matte orange.

Mud very warm, rich, matte, reddish brown.

Boot Black with gold shimmer. This is not as pigmented as I would have expected. It is more a smoky black rather than a jet black.

So that's all the shades broken down for you, here's my first look:


For this I am wearing pigeon in my crease, blended quite heavily, Marsh all over my lid, pigeon then patted lightly on the outer third of my lid and finally Fly on the inner corner, patted on the centre of my lid and on the brow bone. Finished it all off with a good blend (boy does this stuff blend) and a touch of pigeon along the outer third of my lower lash line. 

(I'm wearing Riot from Lime Crime on my lips)

I think that's about all for now. I hope that has given you a general idea of the new Venus II palette and come back soon when I will be taking a look at my Lime Crime Black Friday hall!

Friday, 4 December 2015

Matte... Purple?

So you may have caught on by now to my obsession with matte red lipstick HOWEVER this month it seems I finally caught the purple lip bug and this Black Friday it was my mission in life to pick out the perfect purple lipstick for myself.

I searched and searched for hours and hours and days and days and finally went for these bad boys.


From left to right: Gerard Cosmetics Lipstick in Grape Soda, Gerard Cosmetics Lipstick in Lilac Moon (£10 each from Cocktail Cosmetics), Violet Voss Glitter in Aurora (£6.50 from Cocktail Cosmetics)

In the end, I chose to go for lipstick rather than liquid lipsticks mostly for comfort and because I knew I would want to blend shades and while I'm sure this would have been possible with liquid lipstick I thought it would probably be easier this way.

I was tempted by a quite a few brands, NYX's liquid lipsticks, MAC's Heroine, pretty much every shade of purple from Lime Crime however I felt that Gerard Cosmetics had both of the best shades I had seen and wanted, a pinky bold purple and a lilac.


And here's the look sin glitter. I used Sleek's eau la la lip liner in Raisin to line my lips, then Grape Soda all over and Lilac Moon in the centre of both of my lips. 

I felt a little drag queen at first but I then got used to it.

So I thought

LET'S UP THE DRAG QUEEN GAME!


And used Violet Voss cosmetic glitter in Aurora all around the edges of my lips just leaving a little bare patch in the centre to keep that ombre look.


I'm not sure how much guts it will take me to wear these lipsticks out and about but I know that I want to. All of these products I found very comfy and not too drying, even the glitter which surprised me. The lipsticks take a few coats if you want a bold colour, but I am happy with that.

Anyway, I hope you enjoyed my first dabble in purple lips, I feel this is the start of a beautiful obsession. Help me out by letting me know your favourite purple lipsticks/liquid lipsticks!


Monday, 5 October 2015

LA SPLASH Studioshine Lip Lustre Evil Queen Review


Today's review is going to be short and sweet as I have already reviewed this product in another shade, Aurora, in my last review and I don't want to repeat myself too much.


Evil Queen is a dark berry red matte shade of liquid lipstick, with a very subtle glitter. To me it seems to shimmer red blue and gold shades however in natural light this is barely noticeable at all. It perhaps catches the light slightly more in unnatural light however it is still an extremely subtle effect.

I like this shade, especially as it's October and I can definitely see me wearing this for all things Halloween. 

The same as Aurora, this liquid lipstick I find takes a bit of concentration to use and in these photos I used a Sleek Lip Liner pencil in Raisin 293 to define the edges and get the neatest line I could, which is especially important as this is such a dark dramatic shade. It feels dry but sturdy, and comes off with oil and greasy food but holds strong with drinks.


All in all I love feeling like I am channelling Regina/The Evil Queen from Once Upon a Time in this shade.

Monday, 21 September 2015

LA SPLASH Studioshine Lip Lustre Aurora Review


(Side Note: Apologies for my absence and lack of responses over the past few months. I've been dealing with a lot of changes in my personal life lately and haven't had the time/energy for blogging. Consider this my hopeful return.)


Today I'm reviewing one of the new shades of LA Splash's Studioshine Lip Lustre range, inspired by Disney's female characters. When I saw the internet going crazy over these new lip shades, I admit I was weak. All they had to do was stick the name of a few Disney princesses on these and I had to have at least one lipstick from the range.

I went for Aurora as I loved the dark pinky/red tone it seemed to have and it was a shade I didn't have already as I usually go for straight up, bold reds. I ordered it from ebay in the end, as the postage if ordered directly from LA Splash's website to the UK was pretty extortionate (I wasn't paying £30 for this baby).


First things first: This can be one messy product when applying. My first time wearing this to my friend's birthday dinner, I applied it in the bathroom at work in a huge hurry which was a BIG mistake. There were pink smears all over my face and hands and in the end I had to use my Dolce and Gabbana trusty lipstick over the top to try and cover up the horror underneath. So essentially, probably don't try wearing this on a day you are late for work.

However, when applied calmly and carefully and in half-decent light, I love the result. As I've mentioned before, the more matte a lip colour, the better as far as I'm concerned as like most liquid lipsticks, it doesn't get more matte than this. It can feel a little dry, but I don't really expect anything else from a liquid lipstick like this. It stays put through kisses and drinking but can slide off a bit if you are eating oily food. I use Johnson's moisturising face wipes to get it off at the end of the day which contain oil and therefore work like a charm. 


I find the colour surprisingly flattering on my pale skin and I'm sold, despite the fact that I'm not usually a pink lips person. It reminds me of Rimmel's Kate 107 lipstick which is a favourite, but this is slightly brighter and more pink. 

So, I say, if you fancy a bit of princess in your life, go for it. It's a shame these are so difficult to come by in the UK at the moment, I've now ordered Evil Queen too (couldn't resist as I love a bit of Once Upon a Time) which I shall review shortly! 

Friday, 13 March 2015

Crazy Eyes!


This week I've been feeling really under the weather and unfortunately today I had to drag my self-pitying body out of bed and to a meeting. Therefore I think I subconsciously made the decision to overcompensate for my lack of enthusiasm for getting out of my PJs this morning with BAT S**T CRAZY EYE MAKE UP! I mean really over-the-top, I'm wearing a rainbow on my face kind of eye make up. 

I decided to take a couple of quick pictures for this spontaneous post and share the look with you which I created using a mixture of indie vegan eye shadows and the Urban Decay Vice 3 pallete.


For your reference, I'm wearing: Shiro Cosmetics' Finklestein all over the lid, Notoriously Morbid's Dita on the outer V and a little into the crease, Urban Decay's Alien on the outer half of my lid, Urban Decay's Alchemy  in the crease, outer V and outer third of my lower lash line (what a mouhtful!) and finally a little wash of Urban Decay's Bobby Dazzle  all over and then built up on the inner third of my eye. 

I was surprisingly happy with how this look turned out this morning and I felt it brought a little edge to my otherwise boring outfit today. As a side note, what you can't really see in these photographs is that Finklestein has a strange green/purple thing going on which I love. 

If you happen to have some of these products lying around, give this an experimental try! 

(Note: I'm wearing a coat of Pixie Epoxy under this to bring out the shadows to their best)


Thursday, 12 March 2015

The Matte Reds: Part 1


Searching for the perfect matte lipstick? You've come to the right place! 
I'm an addict when it comes to red lipsticks and for me, it's matte all the way. So today I've decided to share with you some of my favourite matte reds, including one from the new Dolce and Gabbana range (reviewed here). 


Left to right: L'Oreal Exlusive Reds Blake, L'Oreal Exclusive Reds Eva, Rimmel Kate 01, Dolce and Gabbana Desire


1: L'Oreal Exclusive Reds Blake £7.99


To me, this shade is a perfect red. It's the purist red of all the reds! With a lovely very matte finish.

02. L'Oreal Exclusive Reds Eva £7.99


With an identical finish to the Blake shade in the same range, this lipstick is a very rich orange-red. It's not overly bright and therefore I find it very flattering and easy to wear, and I think it would suit olive skin tones beautifully (like Eva's of course)


03. Rimmel Kate 01 £5.49


Similar in colour to Eva but brighter and slightly more red, this shade is pretty bold. It has the least matte finish of the four but tends to dry to a more matte finish after a little while. This is one of my oldest and trustiest reds!

04. Dolce and Gabbana Dolce: Desire £26.50


My current favourite, this shade from Dolce and Gabbana is a cut above the rest, with a somewhat hefty price tag. Personally, I think it's totally worth it for that creamy velvet finish that this lipstick gives, and I love the deep pink-red colour. It's the most matte of all which in my opinion is a great thing!


So there you have it, I hope I've helped you on your way to finding your favourite matte red lipstick! If you're still searching, come back soon for part 2 where I'll have a few more matte reds for you deliberation (I know, I have problems).

Plus, if you have any recommendations for me of your favourites, I'd love to hear about them so please leave a comment below. 

Monday, 9 March 2015

Dolce & Gabbana's New Matte Lipsticks - Dolce Desire

Today is just a really quick post about my first impressions of the new Dolce & Gabbana matte lipstick range. I haven't worn the lipstick out yet so I can't tell you how well it fairs all day (although I'm already thinking it will do pretty well) but thought a few of you out there might want a better grasp on the colour and finish of the product so here it is.


(please excuse the state of me, it's been a long weekend!)


I am OBSESSED with matte red lipsticks, have been for years. To be honest, I struggle with the concept of ever wanting a red lipstick that doesn't have a matte finish. I just don't understand why I would ever want glossy red, when I can have matte red. I'm weird like that. So when I saw the ads for the new range by Dolce & Gabbana I was super excited. Mostly because I wanted to be the woman on the poster of course.

I picked up my lipstick in Harrods yesterday, which I am pretty sure is the only store in the UK currently selling this range and I went for Dolce Desire which is the pinker shade worn by one of the two lovely ladies from the ad campaign.


In the harsh department store lighting the shade looked a little bit too pink for my liking, but I remembered how lovely it looked on the advert and behind the scenes footage and how excited I had been and went for it. Boy am I glad I did.

Firstly it is unlike any other colour I have in my somewhat extensive range of matte reds. The slightly pinkish hue is beautiful and brings out the whiteness in my teeth more than some more orangey reds in my collection which can make them look a little yellow. I think what makes it that bit fresh and original is the deepness of the colour, as most pinkish lipsticks I have tried in the past have been quite bright but this one is so deep and sexy. The finish is PERFECTLY MATTE. Like your lips are coated with velvet or suede. The packaging is simple but feels expensive and heavy as you would expect. 

So to conclude, I am loving this lipstick and no doubt will slowly be building myself a collection of many of the colours in the range although I am super glad I picked this shade to start off with.

Has anyone tried any other shades in the range yet? 

Sunday, 18 January 2015

Review: Smashbox Photo Finish Hydrating Primer


Recently, for the first time in my life I have been suffering with terrible dry skin. My skin has always been quite oily, particularly on my T-zone so I was pretty surprised and upset this winter when I noticed dry, flaky patches on my forehead, nose and chin. While I have been trying a combination of different techniques and products to solve my new skin issues, I decided to try the Smashbox Photo Finish Hydrating Primer when I saw a set of three Smashbox primers on sale in my local store. 

This primer is different to the type of primers I am used to using before I put on my make up, in that it doesn't give that soft, blurring effect. It does however leave a nice dewy look on my skin instead.

The real question for me is whether it combats my dry patches which are heightened by my foundation. 

I've tried this product out for a few days now and I would say, while it doesn't completely cover up my dry skin on a bad day, it definitely helps and can cover it completely when my skin isn't doing so bad.

I don't think I would splash out the full cost for a regular tube of this primer but I also don't regret purchasing it at a lower cost and can see myself easily using it up this winter. 

--------

Keep an eye out for upcoming reviews of the other two Smashbox primers featured in the set.


Monday, 12 January 2015

Tutorial: My Sleepy Concealer Routine (for those pesky dark circles)


One of the problems with being a sleepy beauty enthusiast like me, is those pesky dark circles that never seem to go away! 
So today I decided to share with you my current everyday routine for concealing the dark circles under my eyes. 

Here we go!

Before:


In this photo I have already applied a day cream, face primer and a light foundation

Step 1.
I begin my concealing routine with this cream eyeshadow from No 7 in Pretty Pink! I find the light pink colour and the shimmer give a great brightening lift to my under eye area. I apply it in a triangular shape underneath each eye (about 3 strokes of the applicator per eye) and also on top of the eyelid as an easy eye primer. (If I'm not feeling like wearing a lot of eye make up I can go out just with this on my lids and it looks great. If I want a really refined eye make up look, I usually add another primer on top of this one)

Then I just blend it with my finger!

In this photo I hope you can see the shadow has brightened up my eyes and the shimmer in it reflects the light in this area.

Step 2. I still need a bit more coverage on my dark circles and also I don't want it to look too glittery! So next I apply a thicker concealer over the top.

It's usually this Dermablend Corrective Stick in Opal but sometimes I use my MAC concealer in NW15 instead.


Blend it out with a beauty blender! 
(Please excuse the condition of mine!)


Step 3. Set it with powder

I'm using this loose one by Lancome (poudre majeure exellence) in 01 Translucide


Et Voila! All done with the concealin'


My finished make up look today
(I just went to the shops)

I hope you enjoyed this tutorial and maybe found it useful if you need a little extra help in the under eye area like me!

----------

On a side note, today I got dragged in to a skincare shop by a sales assistant and was told that I had wrinkles and that my face was sagging past my chin and so I needed her £115 face scrub. I found it pretty amusing but at twenty-two, I didn't take that kindly to her suggesting my face has had it already, especially as I try to take pretty good care of my skin. Any similar funny experiences out there?

Sunday, 11 January 2015

Kiko Cosmetics: Eyeshadow Review


102 Dark Pearly Gold

128 Macropearly Whipped Cream

132 Pearly Bronze


137 Pearly Copper

Let me start by saying, these eyeshadows are a steal at only £2.90. I find Kiko Cosmetics a bit hit and miss. All of their products are a bargain but some are of a much higher quality than others. 

 I was really looking for a nice red/burgundy shade when I purchased these colours and so was most excited about Pearly Copper. 

The claim on the Kiko website is that these shadows are highly pigmented and should last up to 12 hours. Highly pigmented is definitely not a phrase I would use for these. 
The photo below shows swatches of the four shades, with no primer underneath. Each one is two or three layers of shadow. 


From left to right: 132, 128, 137, 102

128 Macropearly Whipped Cream is the most pigmented on it's own, although I find this shows up less on the eyes than it does in a swatch on my hand or arm. It tends to get a bit lost, especially in the inner corner of the eye which is where I like to wear it although I do find it works pretty well as a highlighter under the brows, even if it's a bit over the top. It's the most chalky of the bunch and has a fair amount of shimmer.

From left to right: Over Pixie Epoxy, No 7 Smoothing Eyeshadow in Pretty Pink, Urban Decay Eyeshadow Primer Potion in Original

The white is hard to see on my deathly-pale skin so you'll have to take my word for it. This chalky shadow doesn't do very well over Pixie Epoxy. Over Urban Decay it looks pretty matte and it's at it's most chalky. I think this one works the best over the No 7 shadow (in the middle), probably because it is already quite white and shimmery underneath and so enchances these two effects. Ultimately though this shadow doesn't show up that well on any of them.

102 Dark Pearly Gold is my favourite, and the only one I really tend to use. It has the second-richest pigment and is a nice yellow-toned gold. It makes me think of Aztec gold. The pigmentation is still not great on it's own. 

From left to right: Over Pixie Epoxy, No 7 Smoothing Eyeshadow in Pretty Pink, Urban Decay Eyeshadow Primer Potion in Original

Primer brightens this shadow up wonderfully although I do find you have to pack on the colour. The Urban Decay gives the deepest, richest colour until it almost becomes a copper instead of a gold. Pixie Epoxy gives the second strongest colour but really brings out the shimmer which I love, and stays truest to the colour of the shadow on it's own. The No 7 eyeshadow (which I like to use as an eyeshadow base among other things) is the least vibrant and turns the shadow into a highly reflective rose gold. I like to use this shadow as a cheaper alternative to some of my favourite gold shadows and, over a primer, it lasts pretty well. 

137 Pearly Copper isn't really a copper at all. It's a slightly shimmery red/burgundy and the pigmentation is pretty poor. I very rarely use this shadow even though it was the main reason I purchased all of these.

From left to right: Over Pixie Epoxy, No 7 Smoothing Eyeshadow in Pretty Pink, Urban Decay Eyeshadow Primer Potion in Original

As you may be able to tell, this shadow didn't really work at all with Pixie Epoxy. This shadow is more metallic than shimmery like the others and this primer doesn't really bring out the colour much at all. On top of the No 7 the colour goes even paler but it is at it's most shimmery on top of this primer. It also goes quite a nice brown-y-pink colour. The shadow works the best on top of the Urban Decay primer which brings out the metallic quality and really ups the pigmentation too. I've since found some much better quality burgundy shadows (although not for a price like this!)

132 Pearly Bronze I wouldn't call a bronze. This is more a shimmery medium-dark brown. I'd like to use this in the crease and outer v of the eye but it just doesn't work that well. The colour is quite murky and not a rich brown like it appears in the pan.

From left to right: Over Pixie Epoxy, No 7 Smoothing Eyeshadow in Pretty Pink, Urban Decay Eyeshadow Primer Potion in Original

Over Pixie Epoxy the colour is at it's richest but it looks quite a mess (perhaps it wouldn't look as bad patted carefully on to the eyelid on top of this primer). The shadow acquires a grey tone over the No 7 shadow and has a nice shimmer to it. Over Urban Decay the colour is dark and richer but ultimately I find it quite boring (Hey, maybe that's just me).

So there's an extremely in-depth look into four of these budget shadows from Kiko. I hope this was helpful to some, and if you know of any other shades in the Kiko collection that you think stand out like I think 102 does, I'd love to hear about them!